10 Lower Trap Exercises Physical Therapists Want You to Do

Learn about the importance of lower trap exercises and discover the moves recommended by physical therapists.

Published Date: Jun 25, 2024
Table of Contents

If your neck feels tight and painful but stretching doesn’t seem to be helping, your neck may not actually be the source of your tension. Instead, you might need to focus on lower trap exercises that target your trapezius (traps) muscle, which starts at the base of your neck and goes across both shoulders and down your mid-back.

“The trapezius — which consists of an upper, middle, and lower trap — helps bring the shoulder girdle down, which stabilizes the spine and promotes good posture,” says Sarah Kellen, PT, DPT, a physical therapist at Hinge Health. “Oftentimes the upper trap is tight and the lower trap is weak, an imbalance that can lead to neck and shoulder pain, and even headaches.

Many exercise regimens neglect the lower trap, but that’s a mistake, says Dr. Kellen. Incorporating lower trap exercises that strengthen this region is a smart way to decrease your pain and increase your mobility. 

Read on to learn about how strengthening your lower trap can improve everyday function and reduce pain, especially with these lower trap exercises recommended by Hinge Health physical therapists.

Our Hinge Health Experts

Sarah Kellen, PT, DPT
Physical Therapist
Dr. Kellen is a Hinge Health Physical Therapist and board-certified orthopedic clinical specialist. She has a special interest in pregnancy and postpartum care.
Maureen Lu, PT, DPT
Physical Therapist and Clinical Reviewer
Dr. Lu is a Hinge Health physical therapist and board-certified orthopedic clinical specialist with over 17 years of clinical experience.

The following moves are all designed to strengthen the lower trap muscle, but they vary in intensity. The first few are great for beginners. As you get stronger, you can work your way through the moves that are more challenging.

Tap into pain relief. Anytime, anywhere with our app.

Get exercises from a licensed physical therapist and more to relieve your pain. All right from your phone. At $0 cost to you.
Start your app tour

By simply making a “Y” with your arms (as in YMCA), you’ll activate the lower trap muscles correctly.

How to Do It:

  • Stand tall, holding your arms outstretched in front of you at chest height, palms together. 

  • Now, squeeze your shoulder blades together and lift your arms up and out, into a Y shape. 

Another easy move, this activates the lower trap and gets the shoulder blades moving.

How to Do It:

  • Stand with your elbows bent to 90 degrees and resting at your sides. 

  • Move elbows and shoulders backward, while squeezing your shoulder blades together. 

  • Relax your shoulders to the starting position.

Consider this move intermediate. Bending over means you’ll have to work a little harder against gravity. Remember to keep your core engaged so your trunk stays neutral.

How to Do It:

  • Start standing, then hinge at the hips to bring your torso to about a 45-degree angle. 

  • Keep your back flat, and your weight mostly in your heels. 

Now lift your arms up and out to the sides to about shoulder height in a T shape, with your palms down. Try to keep the shoulders away from the ears. 

Lower trap exercises with a resistance band increase the intensity of the exercise. The addition of a resistance band in this move helps counteract a bent-over posture and provides a stretch for the pectorals.

How to Do It:

  • To start, secure a resistance band by opening a door, wrapping the band around the handle, and then closing the door. Gently tug on the band to make sure the door doesn’t open toward you. 

  • Now, take a few steps back from the door with the ends of the band in each hand. 

  • Your arms should be straight and raised to about chest height, and the bands should have some tension. 

  • Stretch the band by pulling your hands to the side of your ribcage while your elbows bend. 

  • Squeeze your shoulder blades together as you hold. Then relax your arms back to the starting position. 

5. Side Lying Arm Rotation

Get 100+ similar exercises for free

When you rotate your arm up, it brings the shoulder girdle up. This move also works the rotator cuff, which is important for reaching to the side during daily activities.

How to Do It:

  • On a yoga mat, lie on your side with your head supported by your arm or a cushion. 

  • Let your arm rest against your side with your forearm hanging down against your stomach. 

  • Keeping your elbow at your side, raise your hand away from your stomach, up toward the ceiling, and hold this position. Lower your hand back down. 

6. Banded Rotation Pull Aparts

Get 100+ similar exercises for free

A somewhat more challenging move, this exercise works the lower trap and rotator cuff together.

How to Do It:

  • Start by standing with a resistance band stretching between your hands, with your palms facing each other and your wrists straight. Your elbows are at your sides. 

  • Now move your hands apart from each other to stretch the band as you focus on keeping your wrists straight and your elbows at your side.

  • Then move your hands back together to return to the starting position.

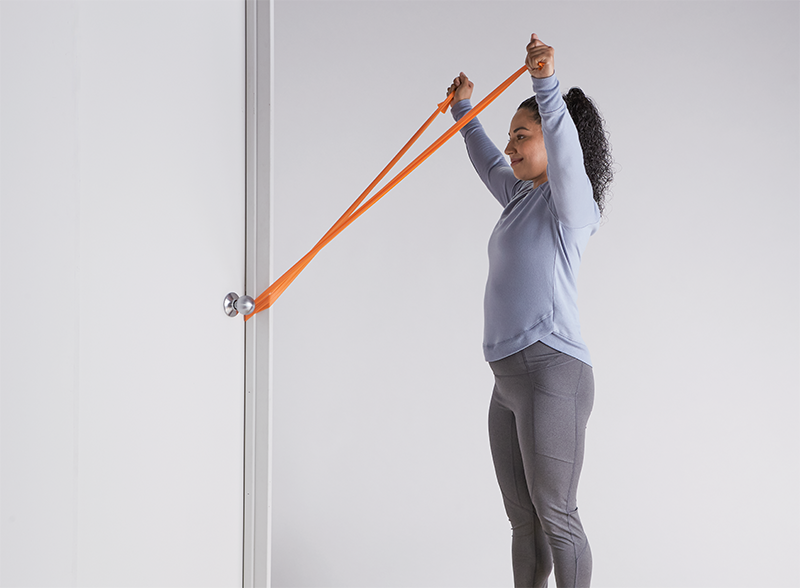
This is the advanced version of the Standing Y (move 1), thanks to the addition of a resistance band which makes it more challenging.

How to Do It:

  • To start, secure a resistance band by opening a door, wrapping the middle of the band around the handle on the other side. Then close the door. 

  • For safety, stand inside the closed door so it opens away from you. This will ensure the band does not accidentally pull the door open. 

  • Now, take a few steps back from the door with the ends of the band in each hand. Your arms should be straight with hands in front of your hips and there should be some tension in the band. 

  • While keeping your arms straight, raise your arms overhead into a Y position.

8. 90-90 External Rotation

Get 100+ similar exercises for free

Once you’ve mastered the Side Lying Arm Rotation (move 5) and Banded Rotation Pull Aparts (move 6), give this advanced move a shot. It helps build strength needed for overhead motion, whether you’re throwing a football or just brushing your hair.

How to Do It:

  • Start by securing a resistance band by opening a door, wrapping the band around the handle on the other side, then closing the door. 

  • For safety, stand inside the closed door so it opens away from you. This will ensure the band does not accidentally pull the door open. 

  • Next, take a few steps away from the door with the ends of the band in one hand. 

  • Raise your arm out to your side, so your elbow and hand are in line with your shoulder.  

  • Bend your elbow to 90 degrees.

  • Now, keeping your elbow in the same position, raise your hand up toward the ceiling to stretch the band. Try to avoid letting your shoulders shrug up toward your ear.

Another advanced move, this one will activate additional parts of the rotator cuff while also strengthening your lower trap muscles.

How to Do It:

  • Stand with one end of a resistance band under your feet, holding the other end in your target hand, arms by your sides. 

  • Now lift your target arm to about shoulder height at a 45-degree angle. 

  • Lower your arm back to your side.

Once you’ve conquered the Bent Over T (move 3), kick things up a notch with this lower trap exercise for posture. It also stretches the pecs and provides some core strengthening.

How to Do It:

  • To start, secure a resistance band by opening a door, wrapping the band around the handle on the other side, then closing the door. 

  • Stand on the closing side of the door to make sure the band does not accidentally pull the door open.

  • Now, take a few steps back from the door with the ends of the band in each hand. 

  • Your arms should be straight out and raised to about chest height with some tension in the band. 

  • Next, move your arms out to your sides, stretching the band horizontally. Focus on squeezing the muscles between your shoulder blades as you hold this position. 

Lower trap exercises don’t just target your lower trapezius muscles. They work all the muscles in your upper back, shoulders, arms, and core. When all the structures that support your traps are strong, you’ll have greater mobility and flexibility that can help prevent future injury. The above exercises recommended by Hinge Health physical therapists are a great place to start. 

The information contained in these videos is intended to be used for educational purposes only and does not constitute medical advice or treatment for any specific condition. Hinge Health is not your healthcare provider and is not responsible for any injury sustained or exacerbated by your use of or participation in these exercises. Please consult with your healthcare provider with any questions you may have about your medical condition or treatment.

The Benefits of Lower Trap Exercises

It’s common to hold tension throughout your back, and certain sitting and standing positions, especially when you stay in the same position for long periods of time, can put pressure on the lower trap region, causing it to tighten up. The good news: With a consistent stretching and strengthening routine, you can improve the mobility in your traps and throughout your neck, shoulders, and back. Here are some benefits you may experience:

  • Increased mobility. If your lower trap muscles are tight or weak and don't have a lot of mobility, your body may try to compensate by putting stress somewhere else. With increased lower trap mobility, you’ll take pressure off other structures that also support your trunk.

  • Reduced risk of injury and pain during exercise and daily activities. When your entire back is more limber, you reduce the risk of strains and aches in your neck, shoulders, and middle and lower back

  • Less stiffness and tension. When your lower traps are strong, you may notice less tension in your neck and shoulders because they’re able to relax more. Stretching is important — tight lower trap muscles need to be loosened in order for them to function effectively. 

PT Tip: Train Your Lower Trap First

“Most people forget to train this muscle, but strengthening it can help with the rest of your routine. Lower trap exercises help balance things out so that other upper-body exercises, like chest presses, become easier,” says Dr. Kellen. “Try doing a few of the above lower trap exercises before beginning your regular upper-body or full-body workout.” 

How Hinge Health Can Help You

If you have joint or muscle pain that makes it hard to move, you can get the relief you’ve been looking for with Hinge Health’s online exercise therapy program.

The best part: You don’t have to leave your home because our program is digital. That means you can easily get the care you need through our app, when and where it works for you.

Through our program, you’ll have access to therapeutic exercises and stretches for your condition. Additionally, you’ll have a personal care team to guide, support, and tailor our program to you.

See if you qualify for Hinge Health and confirm free coverage through your employer or benefit plan here.

This article and its contents are provided for educational and informational purposes only and do not constitute medical advice or professional services specific to you or your medical condition.

$0 Cost to you

Looking for pain relief? Check if your employer or health plan covers our program

Join more than 800K members and over 1,700 companies that trust Hinge Health to get relief.

References 

  1. Trapezius Muscle: Middle Back Pain, Shoulder Stretches, Trapezius Pain. (2021, June 3). Cleveland Clinic. https://my.clevelandclinic.org/health/body/21563-trapezius-muscle 

  2. Ourieff, J., Scheckel, B., & Agarwal, A. (2024). Anatomy, Back, Trapezius. PubMed; StatPearls Publishing. https://www.ncbi.nlm.nih.gov/books/NBK518994